Wiring your dollshouse
ELECTRIFYING YOUR DOLL’S HOUSE KIT
- These instructions are for electrifying a D.H. kit using Double Copper Tape
- Please read the instructions carefully before commencing work
- For easy understanding, we show each stage using different colours on the diagram
- The layout of your house may differ from the basic ‘Double-fronted/central staircase which we have used, don’t worry - the principle is the same, just adjust to suit your house
- Similarly, the measurements given are for kits with room sizes of 12” wide, 14” deep and 9” high, you may need to adjust the measurements for kits of different dimensions
{1} ‘Dry-fit’ the carcass together, without using glue or nails etc.. - help is advisable at this point, to avoid either you or your house collapsing!
{2} Pencil mark both sides of all walls and floors.
{3}Dismantle the carcass -
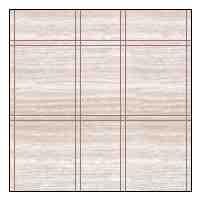
The inside of the back wall should look like this:
{4}Wipe over lightly with a damp cloth to remove dust (but not the pencil marks)
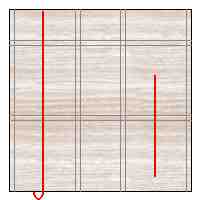
{5}Cut a piece of copper tape 26” long and commencing at the centre of the left side attic room, start to peel away the paper backing from the tape and stick to the back wall, going all the way down through the centre of each room, under the bottom edge and round onto the outside.
{6}Another piece of tape, about 15” long is laid into right-hand rooms from 2” below ceiling of middle room to base of lower room.
First tapes laid should look like this:{7} Cut into backing paper at about 8” (or approx.. half the depth
of your house) from end, then working from the left - leave a ‘tail’ (the end with the backing left on) and apply a strip horizontally across the lower room, two inches below ceiling height, right across whole width of house & crossing both the initial strips.
Cut the backing paper at the edge of the house, then leave another ‘tail’ of 8” with the paper left on.{8}Cut two 9” lengths and peel back 3/4” of paper from one end of each. Lay one over the horizontal strip at the inside wall on each side of the ground floor rooms.
These ‘tails’ will allow for wall lights in the ground-floor rooms, you may omit them if you don’t wish to have wall lights. Similarly, you may add strips to other floors in the same way if you would like wall-lights in other rooms.{9}Cut two pieces of tape approx. 9” long,(or approx.. Half depth plus 1”), peel back 3/4” of paper and
overlay the initial tapes at the following points:
a) the point above the attic floor on the left.
b) the point above the middle floor in the right side room.{10}Another piece of tape about 13” long (to reach almost to front of house when built) is applied in the same way as above to the point above the middle floor in the left side room. These ‘tails’ will lay across the floors to give ceiling lights in the rooms below.
N.B. When overlaying one piece over another in parallel it is very important to lay one piece exactly over the other - or you may create a short.{11}You must now make connections through all the overlaid tapes, using the mini nails.
It is useful to make small pilot holes in the positions required, using a mapping (push) pin or similar. We also find a pair of locking forceps useful to hold the nails, but don’t rush out to buy them (some cheap tool shops sell them for about £2) The nails should be hammered well in or you may not get a good enough connection.
The nails in a parallel connection should look like this:
and a cross-over connection like this:
{12} Loosely fold up all the tails and ‘tack’ them down with some masking tape to keep them out of the way.
{13}Turn the board over and attach the red and black connector block:
Screw the block to the back of the house, just above the copper tape.
Make a pilot hole in each side of the tape.
Twist up the bare ends of the two wires, wrap each around a brass nail -
as tightly as you can and hammer one into each side of the tape.{14}It is useful to test the wiring at this stage:
Plug the wires from a 12V transformer into the block on the back of the house.
Switch on the power and press the test tool firmly into the extreme ends of all the tapes, including all the tails.{15}You may now assemble the house as per the instructions, making sure that the copper tape tails are positioned above the floors of the house.
{16}Peel away the backing of the tails and stick them down along the floors and walls as appropriate.
{17}(Last bit!) As pendant lights do not hang successfully from the roof apex - we usually find it better to put wall lights in the attic space.
Using the remaining tape, run a line from 2/3 up to the point of the gable on the left side - down to the floor - all the way across the floor (crossing the tail on the way) and 2/3 up to the gable point on the right side.
Make a diagonal connection where the two tapes cross.{18}In the left side middle room, you will have a tape running across the floor which comes almost to the front of the house - cross this with another strip of tape, running it across the floor, through the doorway and into the middle of the landing. Make the diagonal connection as before.
- HINT Before you start to decorate your house, it is very useful to cut a piece of paper to fit each room, creasing it tightly into the corners.
Mark the position of the tapes on the walls and note which room. When you have covered the walls with wallpaper, you can then overlay your plan and know exactly where the tape is!
You should also cover all cut ends and the nail connections with some
masking tape as the fungicide in wallpaper paste reacts with metal and will discolour after a period of time.
{19}Ceiling lights will require a small hole drilled in the centre of each floor - but not through the tape (this will cause a short)
{20}All imported lights are sold with about 18” of twin white wire and a two-pin plug. Remove the plug by pulling out the pins and tugging the wires out.
Holding the bare ends of the wires, gently pull them apart to within 4” of the top of the light fitting, making sure that you do not bare the copper wire inside Leaving one inch of separated wires - cut away the excess. Strip away the sheathing by 1/2” - a thumbnail is usually sufficient to do this Twist the wires of each side together, poke through the hole in the ceiling, then wrap each around a brass nail and hammer into the copper strip.
If you are still in the dark, e-mail me with your problems and I may be able to help.